


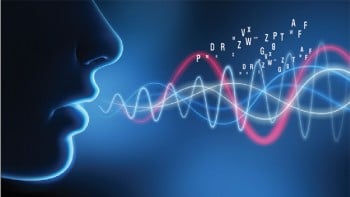
Speech plays the most important role during verbal communication between humans. And phonetics is the study and classification of speech sounds. It is basically categorised into the following three groups:
1. Articulatory phonetics deals with speech production and how sound is produced.
2. Auditory phonetics deals with speech perception, and how sound is perceived.
3. Acoustic phonetics deals with the study of properties of the speech wave.
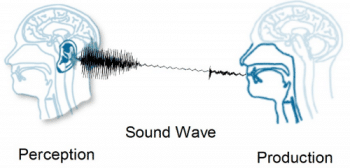
This process is termed the speech chain or the speech communication pathway.
An introduction to speech processing
Analysis of speech signals is an important task. It deals with the manipulation of sound signals to extract meaningful information from them. There are many techniques for speech processing and, in this article, we will discuss some basic methods. Interested readers can go through an excellent tutorial on Praat at http://www.fon.hum.uva.nl/david/sspbook/sspbook.pdf (Reference 1).
Speech, being a non-stationary signal, continuously keeps on changing; hence, in order to model the speech signal, we follow the strategy of segmentation, which is the process of assuming the speech wave to be a static signal for a short period of time in which it remains almost constant. The typical length of such intervals is 20ms to 30ms. Hence, a speech signal is segmented into frames of 20ms-30ms, and each frame is analysed separately.
Spectrum analysis
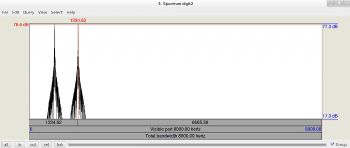
Normally, the signal is represented in the time domain, where the horizontal axis represents time and the vertical axis represents the amplitude (loudness) of the speech signal (i.e., amplitude?time). You can look at the upper half of Figure 3, which is a time domain signal. The difficulty with the time domain is that it can provide only a limited amount of information about the signal. Fourier analysis is an important process, which transforms the signal from the time domain to the frequency domain, also referred to as the Fourier domain. The frequency domain represents the signal in amplitude (decibel)?frequency (Hertz) dimensions. The signal representation in the frequency domain is also known as the frequency spectrum, or just the spectrum of the signal.
A simple time domain signal (with a single frequency f) shows a single spike at f Hz in the frequency domain. A composite signal (combination of multiple frequencies) presents quite a complex spectrum. Let us look at the following simple exampleDual Tone Multi Frequency (DTMF) is the pair of frequencies assigned to each digit when we dial some number through the phone. Table 1 lists such frequencies corresponding to each digit. This is helpful in determining the dialled number. By Fourier analysis, we can obtain the frequencies present in a specific sound signal (dial tone). Figure 2 gives the frequency spectrum for the tone generated by pressing a specific digit.
In addition to DTMF, spectrum analysis is used to identify musical instruments, vowel identification and gender recognition, from audio signals.
Spectrogram analysis
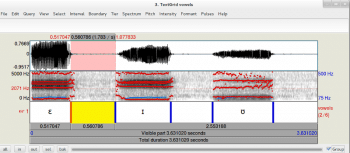
A spectrogram represents three dimensions of a signal, i.e., time, frequency and amplitude. The horizontal and vertical dimensions indicate time (sec) and frequency (Hz) values, respectively. The darkness of the bands indicates the energy density or strength of the amplitude. Absence of darkness (pure white colour) represents the silence zone.
Spectrogram analysis is widely used in vowel identification, silence detection or formant analysis from specific speech utterances. Further, a spectrogram can also be used to identify the category or class of sounds (such as nasals, plosives, fricatives, etc). A typical spectrogram is shown in Figure 3.
Formant analysis
A formant can be considered as a resonance of the vocal tract. In a typical spectrum envelope of a speech signal, formants depict picks of the envelope. Most of the vowels are characterised by the first two formants (F1 and F2) only. This is because formant frequencies reflect the articulatory gestures related to vowel height and the front-back position.
Format analysis is widely used in linguistics. There are many techniques to extract formants from a given speech signal. Lets discuss the easiest approach of getting Formant details from spectrograms. View the spectrogram of the signal and click on Formant >> Show formants, which will show the formant transitions in the spectrogram in red colour, as shown in Figure 3.
Praat
Praat is a tool designed for speech analysis. It was developed at the University of Amsterdam by Paul Boersma and David Weenink. According to them, Praat is a tool for doing phonetics by computers.
Downloading and installing Praat
There are multiple ways of getting Praat. Let us discuss the methods of downloading it on an Ubuntu 13.10 machine. However, the process remains almost the same for all Linux distributions.
1. Standard way (through terminal):
$ sudo apt-get install praat.
2. Get it from the Ubuntu Software Center.
3. Get it from the Synaptic Package Manager.
4. Download it from the Praat website (Reference 2) and extract the archive.
Figure 4 shows a screenshot of Praat installed on the machine. Double clicking the Praat icon will open it. Alternatively, on a terminal, just typing praat will open its interface. The Praat icon comprises lips and ears, which exhibit the main speech production and perception organs in the human body.
Getting familiar with the Praat environment
Once launched, two windows are opened in Praat. One is the Object window and the other is the Picture window. We will discuss only the Object window, since most of the basic functionalities can be achieved through this interface alone. Praat is special in that it offers dynamic buttons upon selection of different sound objects. We will quickly go through the important buttons and their features. Readers are encouraged to explore the features of the rest of the buttons themselves.
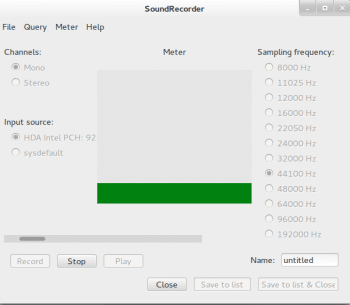
It is very easy to record a sound using the New >> Record Mono Sound menu option. Selecting this option presents a window that is ready to record the sound with some default set parameters. You can modify sampling frequency or channel types. If you do not understand the terms, then keep the default settings unchanged. Pressing the Record button starts recording until the Stop button is pressed. You can test your recording by clicking the Play button. If the recording is acceptable, then specify some meaningful name to the recorded sound file and click on Save to list and then on Close. The sound object will now appear in the Object list. If the recording is not satisfactory, then repeat the recording. A typical screenshot of the Praat Sound Recorder is shown in Figure 5. Note that recording the sound and saving it saves the sound file as the object in the current session only. If you want to permanently save the recorded sound, then use Save >> Save as WAV file menu.
Various functionalities
o Reverse a sound: To record or read a sound in the Objects window, select the sound object which you want to reverse. Click on Modify >> Reverse, and play the sound once again. It will play the sound in reverse. To save the reverse version of the sound, use the Save menu from the top panel. Performing the same operation again will get you back to the original sound.
o Text-to-speech synthesis: You can create a speech synthesiser from a given text. Click on New >> Sound >> Create SpeechSynthesizer. Select the language and voice variant (male/female) and click on the Play Text button.
o Amplify a sound: A soft sound can be made louder by scaling its amplitude. To do this, select the target sound object, and click on Modify >> Formula. In the window that appears, enter the scaling factor for the sound. For example, self*2 will double the amplitude of the sound.
Scripting in Praat
A script comprises a set of commands that need to be executed in a specific sequence to perform a certain task. Praat also supports scripting. Users can write scripts, which are interpreted by an interpreter.
Executing scripts
Let us start with a simple script. Click on Praat >> New Praat Script to open the script editor. The following are some of the usual commands that are often needed in scripts.
Dealing with forms
Praat facilitates the use of forms to get input from users at runtime. Let us look at the use of forms with an illustrative example.
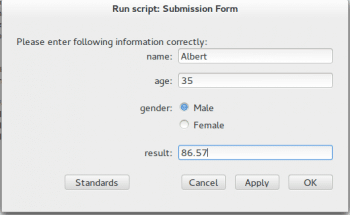
Example 1: To get personal details from the student (such as name, age, gender and results) through the form, and display these details, type:
form Submission Form comment Please enter following information correctly: sentence name: integer age: choice gender: 1 button Male button Female real result: endform writeInfoLine: Welcome ,name$ appendInfoLine: Your age is: ,age, years appendInfoLine: You are a ,gender$ appendInfoLine: Your result is:,result,%
As is evident from Figure 6, the script performs the required task. It uses the form control to request some information from the user. The form entries are enclosed between form and endform. The form keyword is followed by the name or caption given to the form. Form description can be provided using the comment command. All form fields have the following structure:
<data type> <field or variable name> <default value>
The various data types supported in Praat are: a sentence for a text input, an integer for a numeric integer value, real for a real valued input, Boolean for a binary value, etc. Values stored in variables can be displayed simply by typing variable names. If the variable is of a text type, then a $ sign follows the variable name. Clicking on Run executes the script.
Invoking a script from another script
Assume that you want to call a script from another script. For instance, consider that you want to write a script, which, when executed, in turn calls and runs the above script (discussed in Example 1) with specified arguments. If the target external script is formTest.praat, then a script with the following statement will directly execute the script with user-provided arguments.
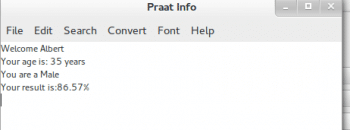
runScript: formTest.praat, Albert,35,Male,86.57
Example 2: To construct a simple signal with the frequency value provided by the user, play its tone, and show its spectrum and spectrogram, type:
# Form begins.. form Signal Analysis comment Please provide the signal frequency and type of analysis you want to perform. positive frequency choice analysis: button Spectrum button Spectrogram endform #Create sound with default parameters Create Sound as pure tone: tone, 1, 0, 0.4, 44100, frequency, 0.2, 0.01, 0.01 #play the sound Play #clear the info window clearinfo if analysis == 1 #Show the frequency spectrum To Spectrum: yes View & Edit else #Show the spectrogram #Edit To Spectrogram: 0.005, 2000, 0.002, 20, Gaussian View endif #display the message writeInfoLine: You have just constructed and listened to a ,frequency,Hz sound signal.
The script to solve the problem given in Example 2 has been presented here. Now, the execution of the script is left to you. You must have noticed that some commands expect a long list of parameters as their arguments, and it is often cumbersome to remember all such options. Praat helps here by introducing a History command, which keeps track of all the operations carried out during a specific session. Selecting Edit >> Paste history in the Praat script writer will populate the entire editor with all the commands used so far. You can keep the required commands and remove others manually, and thats it! Edit >> Clear history flushes out the entire history. The details for the To spectrogram command parameters can be availed by selecting a specific sound object and clicking on Analyse Spectrum >> To spectrogram.
You can play with this script by changing various parameters and options, and observe the effect on the signal.
Sound annotation
Annotating sound involves supplementing metadata to sounds, and providing additional information about the sound. Annotations are useful in building a speech corpus for linguistics research by transcribing speech.
Utterances from a sound file can be segmented into smaller units such as words, syllables or phonemes. This is done by establishing boundaries between two consecutive sound contents at different time stamps and separating them. TextGrids in Praat are used to record timestamps and create boundaries by adding multiple tiers to the sound data. There are two types of tiers:
1. Interval tiers, which are made up of time duration, characterised by starting and ending times (such as phonemes, syllables, words, etc).
2. Point (Text) tiers, that represent events which occur instantaneously at a single point of time, and are basically found in the presence of suprasegmental features (such as the pitch peak, glottal closure, etc).
Let us create a simple annotation at the word level. Follow the steps listed below to generate a simple interval tier corresponding to words.
- Load the sound file which you need to annotate into the Praat Objects window, and select it.
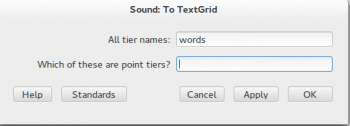
- Click on the dynamic menu button Annotate >> To TextGrid. A form window will appear as shown in Figure 7. Here, you can specify the names of all the tiers you want to add in your TextGrid. In our case, we have only one tier in the TextGrid, namely, words.
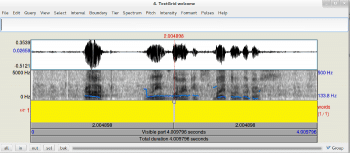
- Select the sound file and the TextGrid object together by pressing the Ctrl button, and click on View & Edit. This will open the TextGrid as shown in Figure 8. You can observe that, below the sound signal, a layer has been added, where you can specify your transcription. Above the sound signal is a text area, where you can write the contents for the selected segment, highlighted in yellow.
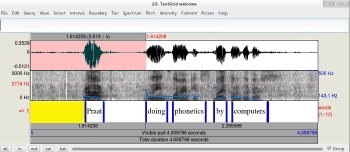
- To determine the boundary of a segment, select a portion of the speech segment, click on the red dotted vertical line first, and then click on the small circle at the top, which will create a boundary for you. Click on the segment you wish to annotate, and add your content.
Figure 9 describes a completely annotated speech utterance at word level.
References
[1] Speech Signal Processing with Praat, David Weenink, http://www.fon.hum.uva.nl/david/sspbook/sspbook.pdf
[2] Praat website, https://www.praat.org
[3] Annotating audio files, http://www.krisyu.org/blog/posts/2013/06/annotating-audio-files/
[4] Tutorial on Praat for Beginners, http://swphonetics.com/praat/tutorials/understanding-waveforms/speech-waveforms/
[5] Introduction to Acoustic Phonetics and Praat, http://ecconcord.ied.edu.hk/phonetics_and_phonology/wordpress/learning_website/chapter_1_introduction_new.htm#1.2


