


Software product development consists of a series of planned activities. During the SDLC (software development life cycle) phase of program development, repetitive actions are required for design refinement, review fixes, build, deployment and regression testing. With the advent of newer programming methodologies and modes of execution like agile and extreme programming, there is a need to automate such tasks to a greater extent.
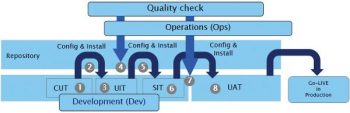

When we automate various stages in the SDLC cycle, depending on the methodology we adopt for the project or the time line for execution, there is a greater demand for the repeated actions of build, deployment, unit testing and promoting the build to the next stage. These activities occur at multiple stages (development, integration testing, system testing, user acceptance and load testing) and repeatedly (for various phases of releases). Saving the time spent in such complex and repetitive tasks helps in improving productivity and reducing manual failures.
So, there is a definite need for automating repeated tasks in build preparation, build and packaging, deployment and in unit/regression testing. This process is called continuous delivery. Continuous delivery is the process of automating the build/release process in the life cycle of software configuration and delivery. It differs from regular build/deployment in that it is a process of automatic delivery with less manual intervention and runs automatically during code check-ins.
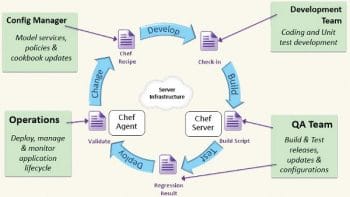
Chef is a popular automation platform for this process of continuous delivery, as it considers infrastructure as a code and helps in build/deployment regularly; it also integrates automatic regression testing to enable certification of the build for promotion to the next stage. Chef helps the software configuration manager to programmatically handle build, deploy, test and to promote code builds into various server zones. This is also technically termed as turning infrastructure into code.
Later, we plan on writing a series of articles on Dev-Ops. For now, lets start with an introduction to Chef, its journey so far, and then install and configure Enterprise Chef on RHEL 7, which will help you to create a Chef platform to work further.
The evolution of Chef
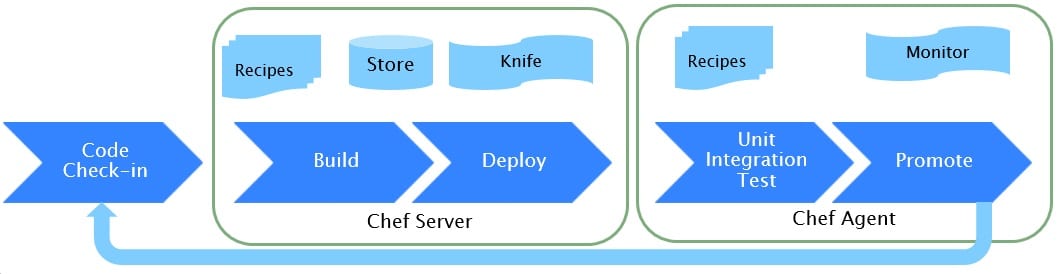
Chef was first released in January 2009 in Linux based continuous deployment (CD); it stabilised around 2010 in Linux as well as Windows. Its original name was Marionette, when Adam Jacob created it as a pilot for automating the build/deployment process for one of his clients. The potential of this tool was realised when it began handling automation efficiently in Amazon work servers. Thats when it was converted to a product and named Chef. It is based on scripts called recipes, which run to push components for deployment and do other build/deployment activities. This set of recipes for a unique deployment environment is called a cookbook. The name Chef, therefore, is so apt and the tool used by Chef for such deployment is also called a knife. Chef and its supporting tools are written using the Ruby language.
Chef incorporates in a unified convenient place, all the development, build, deployment and monitoring tools and services needed to move a software product from initialisation and set-up, through development, on to testing and, finally, release.
Chef enables organisations to quickly deploy, manage and scale existing and new enterprise-grade applications on any infrastructure, with no changes to the code or architecture. It helps to maximise application onboarding and automation by externally orchestrating the application deployment and runtime. The Chef cookbook based approach treats infrastructure as code, enabling you to describe deployment and postdeployment steps for any application through an external blueprint called a recipe, which you can then take from one infrastructure to another, unchanged.
Chef is highly useful in cloud based deployment as well, and simplifies cloud migration by provisioning the compute resources you need, on demand, on the cloud of your choice (public cloud, private cloud, or even hybrid cloud), using its deployment tool to push to the cloud. You can define scaling rules based on any custom metricand Chef will scale out or scale in as needed. Technically, Chef enables you to install your application with a single shell or REST (Representation and State Transfer) API, with no code changes, and also takes your infrastructure monitoring capabilities to the next level. You can easily monitor your application services for availability and performance, define any custom metrics you want to use, and ensure business continuity at all times.
Chefs components
Chef Server or Enterprise Chef can be installed on the Windows platform, Mac OS X or on the Linux platform. We have two flavours of Chef available in Linuxthe Red Hat Enterprise version and the Ubuntu version.
The Chef client is available in UNIX flavours like FreeBSD, Linux, AIX and Solaris, in addition to Windows and Mac OS. Hence, we can set up Chef nodes in all these machines and integrate with a primary hosted Chef server.
Chef has two flavours of installation, namely, Hosted Chef and Standalone or Enterprise Chef. Let us discuss them briefly.
Hosted Chef runs on a preconfigured cloud environment, where the user has to reserve a space for deployment activities and then upload code for automating build, deployment, testing and to promote the build. All required tools for Chef are pre-installed in the hosted platform, and we need to use the predefined platform for our deployment.
Standalone Chef or Enterprise Chef is an on-premise Chef installation, for which users have to provision infrastructure (servers) for Chef tools, and install/configure and maintain the Chef suite along with application configuration and set-up. In a nutshell, Hosted Chef is easy to kick-off for piloting, provisioning and for quicker setting up, whereas Standalone Chef is meant for core customisation and secured on-premise set-ups. With the open source Chef platform, Standalone Chef can be customised to a greater extent like including a public key infrastructure (PKI) based authentication mechanism, IAM (identify and access management) tool integration for roles, rights based server handling, etc.
Chef tools
Chef Server: This helps in automating infrastructure and bundles with Webserver, the Ruby script builder, a deployment manager and monitoring tool; it is used more for server handling operations.
Chef Development Kit: This is also called Chef DK and is used for the customisation of Chef Community scripts, cookbooks and deployment actions.
Chef client/Agent: Each node of the connected system in the Chef managed servers should have a Chef client, which acts as a bridge for communicating with Chef Server and the deployment zone.

The Chef installation procedure
Installing and configuring Chef, as well as preparing recipes and cookbooks for production level deployment, requires a lot of analysis, testing and scaling improvements. Ideally, this needs to be done in a sandbox environment, also called a simulated environment, and should be tuned fully before going live in a production environment with multi-node handling.
The key reason here is that we save a lot of time and investment in test deployment, tuning the script and enhancing it for deployment. Also, in a simulated environment, we have the flexibility to use the developer kit, debugging tools, performance tools like Nagios as well as tune the set-up before taking it to an actual environment.
In this context, we need to create a simulated environment on a VMware based Linux sandbox, and then create agent nodes using Linux VM to mimic a server and node set-up, prior to installing Chef Enterprise and Chef agents.
Setting up VMware: VMware is virtualisation software to create simulated operating environments of different flavours on a single machine. For example, we can create Linux VM in a Windows machine and work in the VM from within Windows itself. It also uses all resources like printers, the Internet, networks, etc, from the host machine in the VMs.
Using virtual environments, we can create VMs of various flavours and work on simulated environments without physically installing the operating environment. This requires the VMware workstation which can be downloaded at https://my.vmware.com/web/vmware/info/slug/desktop_end_user_computing/vmware_workstation_pro/12_0
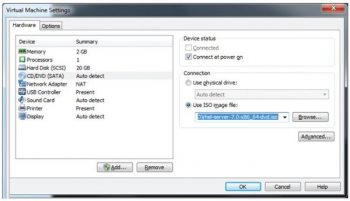
Next, download RHEL 7 ISO and install it in the VMware workstation as shown in Figure 5.
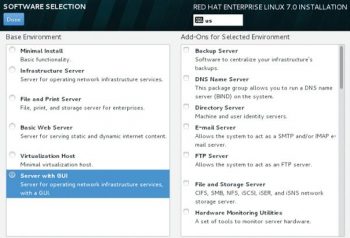
Now select the ISO image which was just downloaded to start the installation process (Figure 6).
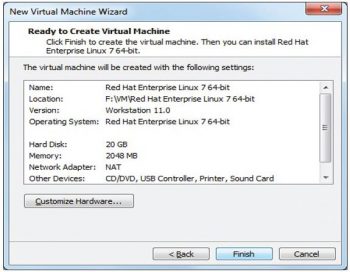
The next step is to validate the selections and agree to proceed with the installation (Figure 7).
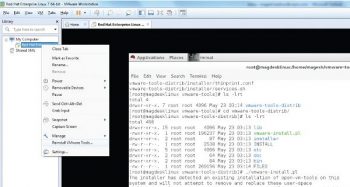
Once the installation is done, install all peripheral software and tools required for Chef. Since Chef is written in Ruby and uses UNIX based tools like Curl, Mail, etc, we need to install all the required software like VMware tools, for which you need root privileges (Figure 8).
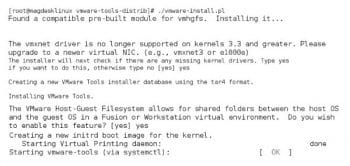
This installation process will take you through a series of steps when you run vmware-install.pl as instructed in Figure 8, which runs as shown in Figure 9.
You must now subscribe to Red Hat Linux to enable the subscription manager to get all downloads directly in the VM itself. If you dont subscribe to the Linux installation, any tool required for Chef installation has to be manually downloaded in the host machine as an RPM package, then ported to the VM, and then run manually. With the subscription option, this can be automated within the VM itself.
Now download the Chef Development Kit (DK) from https://downloads.chef.io/chef-client/redhat/#/ and copy it to the above VM. If you have the Internet configured (proxy or direct network) in Linux VM, then use the browser in the VM (Firefox is available, by default) to download Chef Tools directly into the VM.
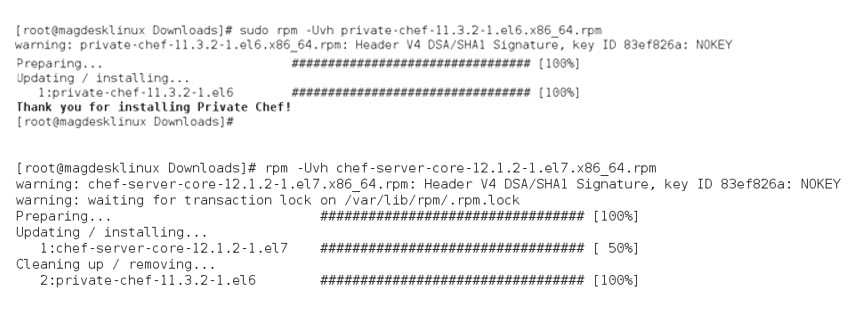
After installing Chef Server components (Figure 10), we can install the Chef Developer Kit (DK), which helps in writing recipes and compiling cookbooks for the Chef set-up. The screen shot in Figure 11 explains the procedure to download and install the Chef DK.
Chef configuration
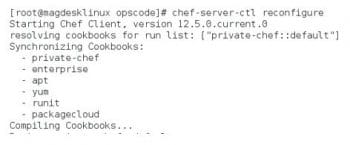
Chef Server and the developer kit are now ready. Next, we need to install agents in nodes and configure them. Before starting out on this step of installing and configuring agents, lets configure the server to be fully available for use and bring it up to connect with the agents. This can be done with the Reconfigure option as shown in Figure 12.
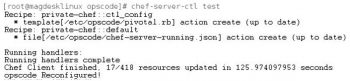
We have completed the installation and configuration of Chef successfully. Now, we should validate the Chef configuration to see if it looks right and is working properly. This can be done by running a test command as shown in Figure 13.


