


During the course of the day, we are involved in various activities like riding a bike, driving a car or attending a meeting, when we are not able to instantly respond to incoming messages or calls. In such situations, how can one inform the caller waiting for a response that one is currently busy but will call back later? What we need is an application that will text back informing the caller about ones current inability to take the call. So lets make an Android app that will respond to our incoming messages or calls without us touching the phone.
While developing the app in the previous issue, you got to know the various options and features available to you on the designer or block editor over the App Inventor browser application. We will be using the same tools now but with a few more components.
GUI requirements
For every application, we have a graphical user interface or GUI which helps the user to interact with the on-screen components, and how each component responds to the users actions is defined in the block editor section.
We will require the following components:
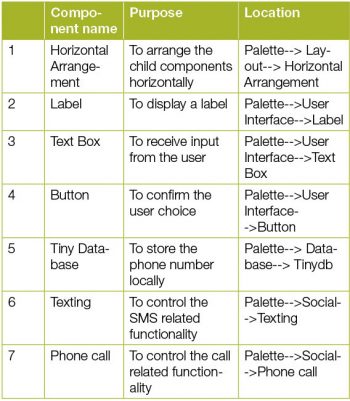
1. Horizontal arrangement – This works as a parent component for all other components which lie inside it and it ensures that each of its child components are aligned horizontally
2. Labels – These are the static text components which are used to display some headings or markings on to the screen
3. Text box – This enables the user to type anything within the box with the help of the on-screen keyboard. We can use it to get the input from the user. Here, in our case, we will let the user type anything using the text box and we will send the same text to our outgoing response messages
4. Buttons – These are generally action initiators. The user presses a button and a specified action takes place. In our case, when the button gets pressed, it will save the text of the text box component into the phones local database
5. TinyDB – Each phone has its own database where it stores the owners username, passwords, high scores, etc. Since every user will have specific pre-defined text, we will save it to the database and retrieve it when needed.
6. Texting component – This enables us to perform various SMS related functionalities. We will need this to send automatic messages
7. Phone call component – This component will detect all call related activity like identifying an incoming call or dialling a number. In our case, we need to track the incoming calls to get the number of the caller, hence we are including this in our project.
Given below are the components that we need for this application, which we will drag from the left hand side palette on to the designer.
Here are the things that you already know, to begin with.
1. Drag and drop the components mentioned above to the viewer.
2. Visible components can be seen while the non-visible components will be located beneath the viewer under the tag Non-visible.
3. Label and text box have to be put within the Horizontal Arrangement to keep them aligned.
4. If you have dragged and placed everything, the layout will look something like whats shown in Figure 1.
Now make the necessary property changes for the label and button components. At this stage we do not have any media usage so we will not upload any image or sound to our application.
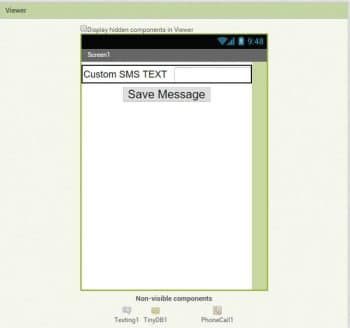
Your graphical user interface is ready. Figure 2 shows exactly how the application will look like after the installation.
We will now head to the blocks editor to define its behaviour so lets discuss the actual functionality expected from our application.
1. Within the app, the user should be able to store the automated text which will be delivered to the mobile number attached with each incoming SMS or call. The user will type in the text box.
2. When any incoming message is received, the application should be able to extract the number attached to the incoming message and send back the automated message. The text will be pre-saved in the database.
3. When any incoming call is detected and it has not been answered, only then should the application be able to extract the number attached to the incoming call and send back the automated message, because there is no point in sending the SMS if the call has been answered by the user.
So lets move on and add these three functions, using the block editor. I hope you remember how to switch from the designer to the block editor. There is a button available right above the Properties pane to switch between the designer and block editor.


Block Editor
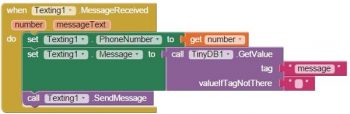
I have already prepared the blocks for you. All you need to do is drag the relevant blocks from the left side palette and drop it on the viewer. Arrange the blocks in the same way shown in Figure 3. I will explain what each block does and how it is called.
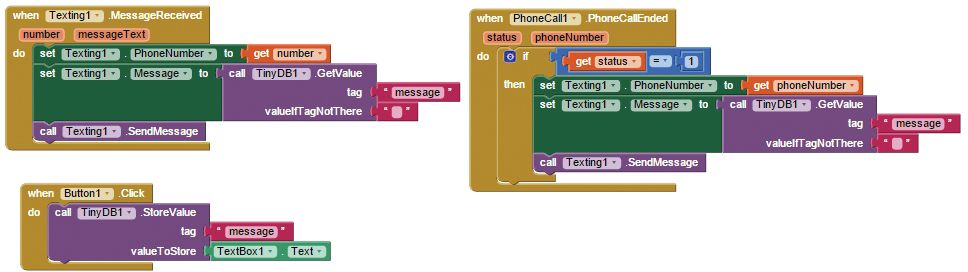
1. The block comes into action as soon as the user presses the button. Its functionality is to save whatever text the user has typed into the text box into the local phone database called TinyDB. To store anything into the database, we have to assign it a tag so that it can be retrieved easily. So we have stored our text with the tag name message.
2. The block shown in Figure 4, shows that when any incoming SMS has been received, it will extract the attached number and will fetch the pre-saved message from the database.
3. When it has a number and message, it will call the send message method (Figure 5) which will deliver the message to the correct recipient.
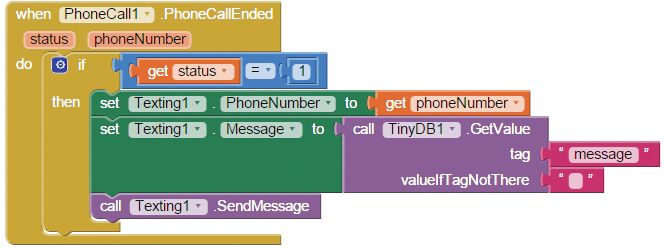
The block gets active when the incoming call has ended and it has not been answered. Here the status of the check point is 1, which shows that incoming call was not picked. Hence it is a missed call.
Likewise, the previous block will get the phone number and pre-saved message from the database and will call the send message method to deliver the text to the correct recipient.
Figure 6 shows how the block editor looks like with all the blocks put together in the block editor.
Packaging and testing
To test your first android application, you need to get it on your android phone. You have to download the application to your computer and then move it to your phone via Bluetooth or USB cable. The steps to download your newly built application are mentioned below.
1. On the top row, click on the Build button. It will show you the option to download the apk to your computer.
2. While downloading, you can view its progress and after it has been successfully done, the application will be placed in the download folder of your directory or the location you have set for your downloads.
3. Now you need to get this apk file to your mobile phone either via Bluetooth or via USB cable. Once you have placed the apk file to your SD card, you need to install it. Follow the on-screen instructions to install it. You might get some notification or warning saying Installation from an un-trusted source. Allow this from the settings of your phone. After successful installation you will see your applications icon in the menu of your mobile. Here you will see the default icon which can be changed and you will learn how as we move ahead in this series.
Your application should work exactly as per the specifications you have given. Now depending on your needs, you can change various things like images, sound and behaviour.
Debugging the application
We have just created the prototype of the application with very basic functionality and what most users might be interested in. Now lets look at various aspects that require serious attention so as not to annoy the user. Consider the following cases:
1. What will happen if the user has not stored any text?
2. What if the user has typed text in the text box but not pressed the Save button. Will the app be able to send text? Will it be able to send an SMS when the app is opened the next time?
3. If we want to respond only to particular contacts, then how can we filter the numbers from incoming calls or messages?
These are some creepy scenarios that could occur and a user would want your application to respond to the situation with intelligence
Think over these scenarios and figure out how you can integrate them into the application? Do ask me if you fail to address any of the above cases.
Faciaest, te volo


hello sir I have a issued with this app. I have to filter the contact if person receive one sms then he will not get any sms untill 24 hours gone. how could i do i dont know plz help me. sorry for bad english