


Let us continue our journey to master ns-3. We are not yet ready to foray into its strongly fortified castle so, instead, lets explore Doxygen, Waf and socket programming. Once they are conquered, we will be ready for a direct attack on ns-3.
Documenting ns-3 with Doxygen
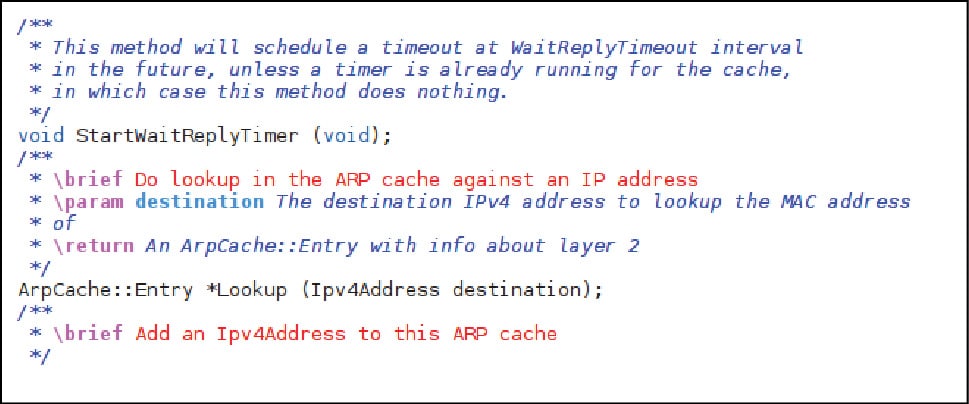
Programming 101 teaches us that comments make programs more understandable. We also learn that comments are removed by the compiler at the first phase itself. But hats off to the ingenuity of Dimitri van Heesch who created Doxygen, which made the whole business of commenting a lot more exciting. Doxygen is a document preparation tool used by software developers to automatically generate documentation for projects, provided they are commented with tags known to Doxygen. To a developer, this is a real gift but to a novice it might be a slight hindrance. Unlike normal comments, in Doxygen, comments are not intended to help the person who reads the source file directly; rather, they aid in the automatic document generation. Initially, when you go through the source files of ns-3, which are plagued with Doxygen style comments, you might find them unattractive. Figure 1 shows an ns-3 source file with Doxygen comments.
So is it necessary to learn Doxygen to master ns-3? The short answer is No. Let me elaborateif you know Doxygen, well, thats great! You will have a clear idea where to look for answers in the ns-3 documentation. But if you are not familiar with Doxygen, then all you have to do is remember the fact that whatever text comes in between /** and */ in an ns-3 source file is a Doxygen comment, and it in no way affects the working of the ns-3 source files written in C++.
All commands start with a backslash (\) or an at-sign (@). For example, you might see commands like \brief, \author,
\param, \bug, etc, inside Doxygen style comments. They convey a special message to the Doxygen parser. The command \brief is used to start a paragraph that serves as a brief description. \author starts a new paragraph to display the author names. \param starts a parameter description for a function parameter with a name, followed by a description of the parameter. \bug is used for bug reporting. There are many more commands used in Doxygen, but you need to look them up only if a need arises. So for now, let us not worry much about Doxygen but move forward and tackle other issues relevant to ns-3.
Installing ns-3 with Waf
Software installation on Linux is often considered troublesome by new users and gives them nightmares. To simplify the installation procedure, ns-3 uses a Python based build automation tool called Waf. Those who are familiar with ns-2 might remember that a tool called make was the build automation tool in it. But in ns-3, make is replaced by Waf; a relatively modern tool.
ns-3 can be installed by using individual source files or a tarball (archive) release of the source files. I will only discuss the installation of ns-3.22 (the latest version of ns-3) with the tarball release of source files. But remember, with different operating systems and different versions, ns-3 installation might fail occasionally. If that happens, you are the victim of a problem called dependency hell. In case of a failed installation, please follow the detailed installation steps given at www.nsnam.org/docs/release/3.22/tutorial/html/getting-started.html#building-ns3. To follow the installation steps of ns-3.22 given here, you need to download a file named ns-allinone-3.22.tar.bz2. Please remember that this file alone will enable you to install ns-3 with Waf. The file can be downloaded from www.nsnam.org/release/. It is an archived and compressed file with a size about 25MB. The extension .tar denotes an archive file and the extension .bz2 is associated with the file compression utility bzip2. The installation requires GCC tools like g++. But usually, the Linux environment will contain all the required tools, by default. So the only thing to ensure is that you have Waf installed in your system prior to ns-3 installation.
If you feel that you are ready to install ns-3, then let us begin. First, create a new directory in your Linux file system called ns (or any other name that you prefer). Then copy the file into the directory ns. After copying, you have to extract (unzip) the file. To do so, either right click on the file with your mouse and select the menu item called extract here or something similaror execute the following command on a terminal. Set the path of the terminal to the directory ns.
tar xjf ns-allinone-3.22.tar.bz2
Now you have the unzipped file inside the directory called ns-allinone-3.22 in your current directory ns. Move to the directory ns-allinone-3.22/ns-3.22 by typing the following command in a terminal:
cd ns-allinone-3.22/ns-3.22
To start the installation of ns-3, type the following commands on the terminal:
./waf configure
./waf clean
./waf --build-profile=debug --enable-examples --enable-tests configure
This will install ns-3 with the build profile debug enabled. If you want to enable the build profile optimized, then use the following command:
./waf --build-profile=optimized --enable-examples --enable-tests configure
But remember that many of the example scripts provided by ns-3 may not be available with the build profile optimized. If the build profile used is debug, you can execute the Hello World equivalent of ns-3 by typing the following command on the terminal:
./waf --run hello-simulator
The output of the script executed is Hello World. Thus, we have executed our first ns-3 scripta milestone in our long journey.
The basics of socket programming
Now that we have installed ns-3 and executed our first ns-3 script, the next logical step is to learn socket programming. To do so, let us begin by discussing the TCP/IP model of a network, which divides the different functionalities associated with a computer network into a number of layers. The different layers are the application layer, transport layer, Internet layer and the link layer (the link layer in the TCP/IP mode also includes the physical layer of the OSI model another network model).
The process of sending a text file from one system (node) to another can be summarised as follows. At the sender side, the message is first processed by the application layer protocol, FTP, which deals with the user aspects, followed by the transport layer protocol, TCP, responsible for process-to-process connectivity (selecting the correct process from a number of processes at the receiver node). This is followed by the network layer protocol, IP, which is responsible for source-to-destination connectivity (selecting the receiver node from a number of nodes in a network), and finally, a link layer protocol, say ARP, which helps in finding the next node by converting the IP address to a MAC address, is called. At the receiver side, all these layers operate on the message in the reverse order. Even though there are four layers associated with network communication, in socket programming, we mostly worry about the two layers in the middlethe transport layer and the network layer.
The protocol data units associated with these layers are as follows: frames in the link layer, packets in the network layer, segments (for TCP) or datagram (for UDP) in the transport layer, and messages in the application layer. Similarly, three of these layers have addresses associated with them the port address (16 bit) associated with the transport layer, the IP address (IPv4 address is 32 bit and IPv6 address is 128 bit) associated with the network layer, and the MAC address (48 bit) associated with the link layer. So we need at least a few of these addresses for communication, depending on the nature and placement of the two nodes that are communicating.
Now that we are familiar with the layered architecture of a network and the different addresses associated with each layer, the next important question to be answered is, What is a socket? It is a mechanism used to realise client-server or peer-to-peer communication in a network. It is a protocol-independent method to create a connection between two processes residing in the same computer or different computers in a network. This clearly highlights one major difference between ns-2 and ns-3. In the latter, real data is sent between two processes to analyse the networks behaviour, whereas in ns-2, real data flow does not happen.
Socket programming is used in ns-3 to set up inter-process communication between two processes such that actual data can be sent between them. This data flow is monitored by various ns-3 modules and summarised into a log file called the trace file. By analysing the trace file, you obtain your results.
Now let us look at how to set up a connection between two processes as a starting point to ns-3 simulation. A socket acts as an end point to a communication channel. In order to set up communication between two processes, there should be two socketsone at the senders side and another at the receivers side. The behaviour of these two sockets is different. Often, one behaves like a server socket and the other like a client socket. The client tries to connect to the server to obtain data. For practical implementation, socket APIs provided by the operating system are used. The most commonly used socket APIs are the Berkeley sockets (BSD sockets), which essentially are a computing library for Internet sockets and UNIX domain sockets used for inter-process communication. These APIs were originally developed for C but can be used with C++ also, without any changes.
Since most communication nowadays involves the Internet, let us only discuss the Internet socket. It is characterised by its address and the protocol used. The address of an Internet socket consists of the IP address and the port number, thus involving the transport layer and the network layer. Another important aspect is the underlying transport protocol used; the choices include TCP and UDP.
Communication involving sockets can be broadly classified into two typesreliable communication (client-server) and unreliable communication (peer-to-peer). In reliable communication involving TCP, a virtual circuit is established, which guarantees packet transmission. In unreliable communication involving UDP, a datagram based communication model is followed, which only provides the unordered delivery of packets. There are a number of socket APIs (system-defined functions provided by various header files), which help us realise TCP and UDP based communication. First, let us discuss the APIs used commonly by both TCP and UDP connections.
Socket APIs common to TCP and UDP connections
socket: The socket API is used to create a socket of a given domain, type and protocol. In case of a TCP connection, both client and server use this function. For a UDP connection, both the peers (nodes) use this function.
int socket (int domain, int type, int protocol);
The domain is AF_INET (IPv4 only) or AF_INET6 (IPv6 or IPv4). The type is SOCK_STREAM for TCP and SOCK_DGRAM for UDP. The protocol is usually set as 0 so that the type defines the connection of the domain.
bind: The bind API gives the address of the socket on the server side. It binds a particular socket with an address to which other processes can connect. In the Internet protocol, the address is a combination of the IP address and port address. The bind API is only used at the server side in TCP and at the receiver side in UDP.
int bind ( int sid , struct sockaddr *addrPtr , int len );
Here sid is the socket ID, addrPtr points to the address structure and len is the size of the pointer addrPtr.
close: The close API is used to close a socket and terminate the connection. This results in freeing all the kernel data structures previously allocated.
int close( int sockid );
Socket APIs specific to the TCP connection
send: The send API is used to send a message over a stream. It returns the number of bytes sent or -1 in case of a failure.
int send (int sid, const char *bufferPtr, int len, int flag);
Here bufferPtr contains the message to be sent and the flag is set as 0, by default.
recv: The recv API is used to receive up to len bytes in bufferPtr, and it returns the number of bytes received or -1 in case of failure.
int recv (int sid, const char *bufferPtr, int len, int flag);
Socket APIs that are specific to the TCP server
listen: The listen API fixes the maximum number of connections the server can accept. It returns 0 in case of success or -1 in case of failure.
int listen (int sid, int size);
Here, size sets the maximum number of connections the server can accept.
accept: The accept API connects a specific client to the server. It waits for an incoming connect request from the client, and returns the socket ID and address of the client connected.
int accept (int sid, struct sockaddr *addrPtr, int *lenPtr);
Here, the accept API creates a new socket for the client whose connection it has accepted.
Socket APIs specific to TCP clients
connect: The connect API is used by the client process to specify the address of the server to connect with.
int connect (int sid, struct sockaddr *addrPtr, int len);
Here, addrPtr specifies the server address to connect with, and the API returns 0 in case of success and -1 in case of failure.
Socket APIs specific to UDP connections
sendto: The sendto API is the UDP counterpart of the TCP API send. It additionally specifies the address to which the message is to be sent because no prior connection is established in UDP communication.
int sendto ( int sid, const void *bufferPtr, size_t bufferLength, int flag,
struct sockaddr *addrPtr, socklen_t addrLength );
Here addrPtr specifies the address of the node to which data is sent. It returns the number of bytes sent or -1 in case of failure.
recvfrom: The recvfrom API is the UDP counterpart of the TCP API recv. recvfrom obtains the sender address as additional information from the variable addrPtr.
int recvfrom ( int sid, void *bufferPtr, int bufferLength,
int flag, sockaddr *addrPtr, i nt *addrLengthPtr );
The recvfrom API returns the number of bytes received or -1 in case of failure.
Socket programming header files
The socket programming APIs are not provided by a single header file. The header files <sys/types.h> and <sys/socket.h> are included in every program to access functions like socket, bind, listen, accept, connect, send, recv, sendto, recvfrom, etc. The header file <unistd.h> part of the POSIX library is included to access the close function. The header file <netinet/in.h> is included to use structures like sockaddr_in, which is used to store addresses for the Internet address family. To access the gethostbyname function, which searches the database and finds an entry that matches the host name specified by the name argument, we use the header file <netdb.h>. The header file <arpa/inet.h> is included to use the function htons, which converts an unsigned short integer from host byte order to network byte order. There are many other header files and functions in socket programming. But I am only discussing the bare minimum, which are absolutely essential.
An example of TCP client-server communication
Now let us look at an example where a TCP connection is established between a client and a server:
// TCP server program tcp_server.cc
#include<iostream>
#include<cstdlib>
#include<cstring>
#include<unistd.h>
#include<sys/types.h>
#include<sys/socket.h>
#include<netinet/in.h>
using namespace std;
int main() {
int sockfd, newsockfd, portno;
socklen_t cli;
char buffer[256];
struct sockaddr_in serv_addr, cli_addr;
int n;
sockfd = socket(AF_INET, SOCK_STREAM, 0);
bzero((char *) &serv_addr, sizeof(serv_addr));
portno = 3333;
serv_addr.sin_family = AF_INET;
serv_addr.sin_addr.s_addr = INADDR_ANY;
serv_addr.sin_port = htons(portno);
bind(sockfd, (struct sockaddr *) &serv_addr, sizeof(serv_addr));
listen(sockfd,1);
cli = sizeof(cli_addr);
newsockfd = accept(sockfd, (struct sockaddr *) &cli_addr, &cli);
bzero(buffer,256);
n = read(newsockfd,buffer,255);
cout<<Message Received from Client : <<buffer<<\n\n;
n=send(newsockfd,Your Message Received,21,0);
close(newsockfd);
close(sockfd);
return 0;
}
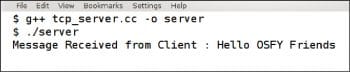
Both the client and server programs do not contain any code for error checking in order to reduce the size. The function bzero copies zeros on an array. The port number assigned to the server is 3333. The server listens to this port for the incoming connect request from the client. The client should send its requests to this port checked by the server for connections. The port number should be that of an ephemeral port ranging between 1024 and 49151. BSD sockets often use port numbers between 1024 and 5000. Figure 2 shows the terminal executing the server program.
// TCP client program tcp_client.cc
#include<iostream>
#include<cstdlib>
#include<unistd.h>
#include<cstring>
#include<cstdio>
#include<sys/types.h>
#include<sys/socket.h>
#include<netinet/in.h>
#include<netdb.h>
using namespace std;
int main() {
int sockfd, portno, n;
struct sockaddr_in serv_addr;
struct hostent *server;
char buffer[256];
portno = 3333;
sockfd = socket(AF_INET, SOCK_STREAM, 0);
server = gethostbyname(127.0.0.1);
bzero((char *) &serv_addr, sizeof(serv_addr));
serv_addr.sin_family = AF_INET;
bcopy((char *)server->h_addr, (char *)&serv_addr.sin_addr.s_addr, server->h_length);
serv_addr.sin_port = htons(portno);
connect(sockfd,(struct sockaddr *) &serv_addr,sizeof(serv_addr));
cout<<\nEnter the Message: ;
bzero(buffer,256);
cin.getline(buffer,256);
n = send(sockfd,buffer,strlen(buffer),0);
bzero(buffer,256);
n = read(sockfd,buffer,255);
cout<<Acknowledgement from Server : <<buffer<<\n\n;
close(sockfd);
return 0;
}
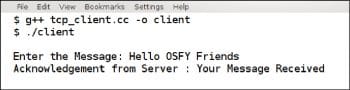
This is a very simple client-server program in which the client sends a message to the server, and the server prints the message on its terminal before replying with an acknowledgement. The client, in turn, prints the acknowledgment from the server on its terminal. The function bcopy copies memory regions of arbitrary length. The client is also assigned the port 3333, same as the server. The IP address used by the client is 127.0.0.1, which is a special IPv4 address denoting the local host. This happens because the client and server processes are running on the same system. But if the server is running on a system other than the client system, then use the IP address of the system running the server process in the client program. Since TCP is a connection-oriented protocol, the server program should be executed before the client program; otherwise, the client will not be able to connect to the server. Figure 3 shows the terminal executing the client program.
An example of UDP peer-to-peer communication
Usually, in UDP, the communicating nodes are not considered as client and server, but are treated as peers involved in communication. To save some space, I havent included the program here. You can download all the programs discussed in this article from opensourceforu.com/ article_soure_code/june2015/ns3.zip.
There are two UDP based programs udp_sender.cc and udp_receiver.cc. But there are no big differences between TCP and UDP programs. Instead of using send and recv functions, UDP programs use sendto and recvfrom functions. Unlike TCP, in UDP it is not mandatory for the receiver process to be active before the sender process. Each packet contains the destination address in UDP because it is a connectionless service. This is not required in TCP. While using UDP in programs the functions listen, accept and connect are not used. Even though the programs are somewhat similar, how TCP and UDP actually work is quite different. But we will deal with those differences while learning ns-3.
Socket programming contains a lot of topics which countless authors and textbooks are trying to tackle effectively. To summarise everything about socket programming into a few pages, I was compelled to omit many important topics. I know crimes of omission are far more serious than crimes of commission, but do forgive me. For a thorough understanding of socket programming, do refer to the book titled UNIX Network Programming, Volume 1: The Sockets Networking AP by Richard Stevens.
Maintaining ns-3 with Mercurial
All large software projects require a revision control tool for source code management during their development phase, and ns-3 is no exception. The very popular revision control tool called Mercurial is used with ns-3. But I will not discuss Mercurial in this series, because its need arises only when you start contributing code to the ns-3 project. At present, our aim is to familiarise ourselves with ns-3; becoming a part of ns-3 development is not our goal. If at a later stage, your mastery over ns-3 allows you to contribute code, then an understanding of Mercurial will be a necessity. There are Mercurial commands like clone, add, commit, etc, which will allow you to make a copy of an existing project and add your own content to it. I will be content if I could help somebody reach that level with this series on ns-3.


Interesting suggestions . For what it’s worth if you are requiring a a form , my boss filled a sample version here http://goo.gl/q6Yx5z.