


IBM Worklight provides an open, comprehensive and advanced mobile app development platform for smartphones and tablets. It can be used to create all kinds of native, Web-based or hybrid mobile apps very easily. It includes the IBM Worklight Studio?an Eclipse-based IDE (integrated development environment) in which all the coding and integration tasks are performed to develop a fully functional mobile app.
IBM Worklight consists of five main components as shown in Figure 1.
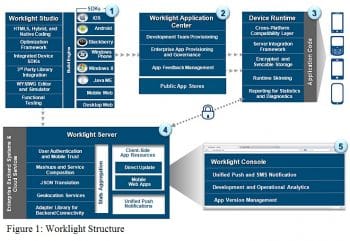
Worklight Studio
This is one of the leading tools for cross-platform, hybrid development that maximises code reuse and enables per-device optimisation. You can make apps for Android devices, the BlackBerry or other devices.
Worklight Application Centre
The Worklight Application Centre enables companies to easily set up an app store for their enterprise and development teams.
The application centre provides:
- Administrators with fine-grained control over the distribution of mobile apps across the enterprise, including ACL and LDAP support;
- Employees with a central location for the latest apps needed by their department and optimised for their device;
- Developers with an easy way to distribute mobile builds and elicit feedback from development and test team members.
Device runtime
Device runtime is client-side runtime code that embeds server functionality within the target environment of deployed apps.
IBM Worklight Server
The Java-based server is a scalable gateway between applications, external services, and the enterprise backend infrastructure. The server contains security features to enable connectivity, multi-source data extraction and manipulation, authentication, the direct update of Web and hybrid apps, analytics and operational management functions.
Worklight Console
This is a Web-based UI that allows application version management (installs, updates, disables and enables), and push management that provides administrative dashboards for deployed applications and installs adapters.
I am not going into too many details because a lot of information can be found on the IBM website.
Installing Worklight in Eclipse
Open Eclipse and go to the Help tab. Click on it and select Eclipse marketplace.
A window will open; search for worklight and press Enter. Youll find two products related to Worklight as shown in Figure 2.
Click on the Install button; it’ll check the product and the Confirm button will appear. Click on it and the progress bar of the download will be shown. After installation, you will see the Update and Uninstall buttons; this means you have installed Worklight successfully.

Installing the Android Development Kit (ADK)
Before installation, change the perspective of Eclipse. Go to the Window tab —> Open Perspective > Java.
After changing the perspective, open the window tab again, and check whether the ADK is there. If not, install the ADK in the same way as we installed Worklight earlier.
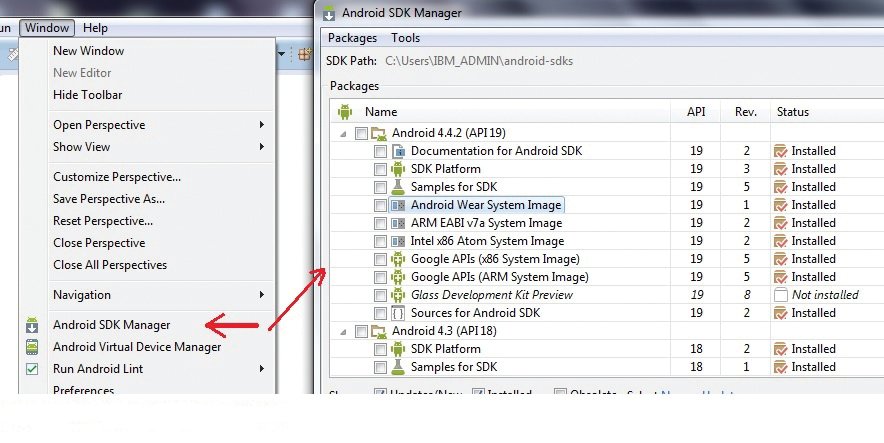
After installing the ADK, check the Android SDK manager. Some APIs would have been installed, while some will have to be installed after some time as shown in Figure 3.
Making an Android virtual device
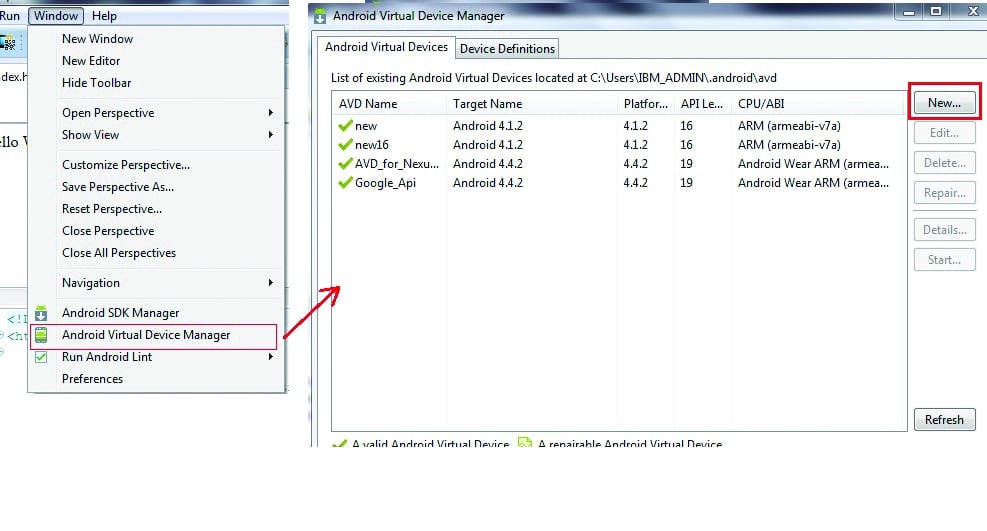
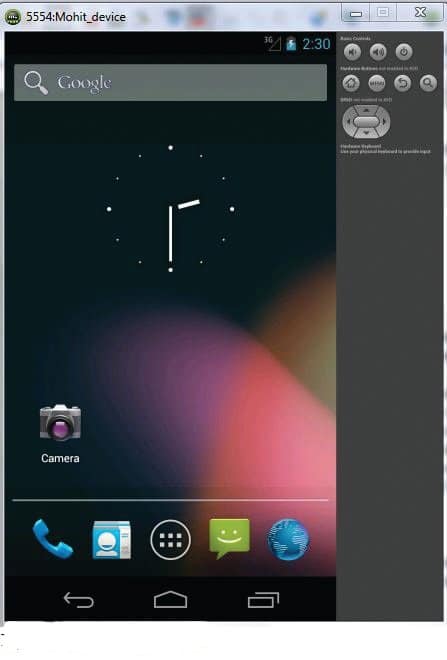
Open the window tab and click on Android Virtual Device Manager as shown in Figure 4. When a window opens, press New and fill in the details of the devicein this case your Android mobile phone. Next, press OK, select your newly created device and press the Start button. You will be asked about the real size of the screen/display. Now, press Launch. After some time, a beautiful Android screen will come up as shown in Figure 5.
Making and deploying Android apps
Lets start off by creating a Worklight project called Mohit_Android. Click Next and fill in the applications name, say mohit_android, and then press Finish. This opens a screen as shown in Figure 6. While opening the screen, sometimes, it changes the perspectivewhich means it sets it toJava EE if this was not set yet. You can manually change the perspective.
So weve finished with the setting up, and it’s time to make our first app. We are going to make a simple calculator.
Step 1: Given below is the Java script code.
<html>
<body>
<font color = red> Mohit’s Calculator </font>
<FORM NAME=”Calc”>
<TABLE BORDER=4>
<TR>
<TD>
<INPUT TYPE=”text” NAME=”Input” Size=”16″>
<br>
</TD>
</TR>
<TR>
<TD>
<INPUT TYPE=”button” NAME=”one” VALUE=” 1 ” OnClick=”Calc.Input.value += ‘1’”>
<INPUT TYPE=”button” NAME=”two” VALUE=” 2 ” OnCLick=”Calc.Input.value += ‘2’”>
<INPUT TYPE=”button” NAME=”three” VALUE=” 3 ” OnClick=”Calc.Input.value += ‘3’”>
<INPUT TYPE=”button” NAME=”plus” VALUE=” + ” OnClick=”Calc.Input.value += ‘ + ‘”>
<br>
<INPUT TYPE=”button” NAME=”four” VALUE=” 4 ” OnClick=”Calc.Input.value += ‘4’”>
<INPUT TYPE=”button” NAME=”five” VALUE=” 5 ” OnCLick=”Calc.Input.value += ‘5’”>
<INPUT TYPE=”button” NAME=”six” VALUE=” 6 ” OnClick=”Calc.Input.value += ‘6’”>
<INPUT TYPE=”button” NAME=”minus” VALUE=” – ” OnClick=”Calc.Input.value += ‘ – ‘”>
<br>
<INPUT TYPE=”button” NAME=”seven” VALUE=” 7 ” OnClick=”Calc.Input.value += ‘7’”>
<INPUT TYPE=”button” NAME=”eight” VALUE=” 8 ” OnCLick=”Calc.Input.value += ‘8’”>
<INPUT TYPE=”button” NAME=”nine” VALUE=” 9 ” OnClick=”Calc.Input.value += ‘9’”>
<INPUT TYPE=”button” NAME=”times” VALUE=” x ” OnClick=”Calc.Input.value += ‘ * ‘”>
<br>
<INPUT TYPE=”button” NAME=”clear” VALUE=” c ” OnClick=”Calc.Input.value = ””>
<INPUT TYPE=”button” NAME=”zero” VALUE=” 0 ” OnClick=”Calc.Input.value += ‘0’”>
<INPUT TYPE=”button” NAME=”DoIt” VALUE=” = ” OnClick=”Calc.Input.value = eval(Calc.Input.value)”>
<INPUT TYPE=”button” NAME=”div” VALUE=” / ” OnClick=”Calc.Input.value += ‘ / ‘”>
<br>
</TD>
</TR>
</TABLE>
</FORM>
</body>
</html>

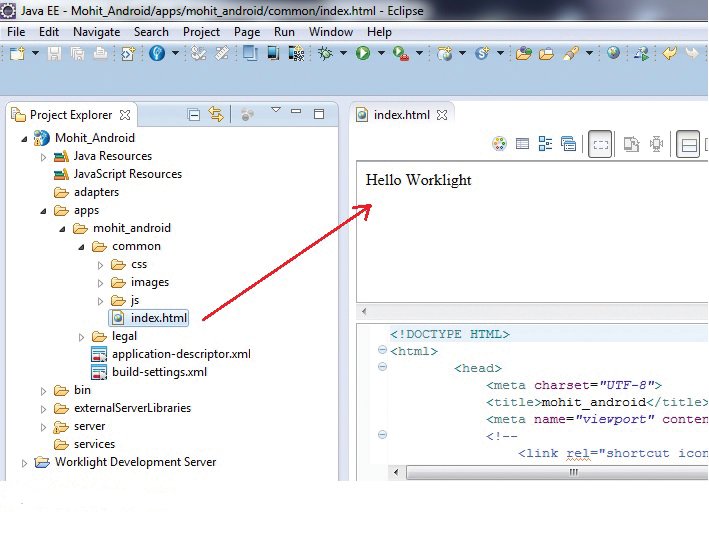
Copy the above code and paste it in the index.html page as shown in Figure 7.
Step 2: Create the Worklight Environment as shown in Figure 8. When a window opens, select Project Name, then Application Name and check the Android Phone & Tablets box before clicking on Finish.
Step 3: Right click on the mohit_android folder (under the Apps folder); go to Run and then select Run on Worklight Development Server.
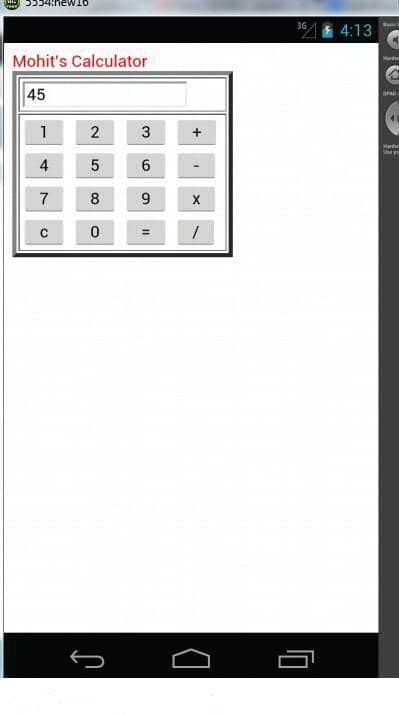
Step 4: After the successful build, right-click on the newly created Mohit_android_AppAndroid (it may be a different name, sometimes) Android project. Select Run As > Android Application to launch it on the emulator, and verify if it works. Figure 8 shows the app is running successfully.


