


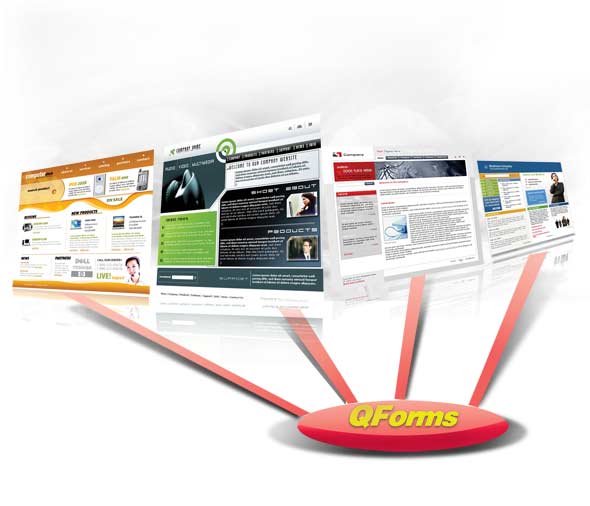
 QForm is the state-conscious, event-driven object management system for creating Web pages.
QForm is the C and V of the MVC architecture of QCubed. It relieves you from typing HTML code for every single element, and dealing with monotonous and repetitive code for handling user actions.
The entire world is moving to the Web. Socket programming is becoming passé for even lower-level programs as JavaScript catches on with JSON, while other Web technologies such as Web sockets promise better results in an increasingly distributed world. We have become habituated to using Web services that promise to be reliable. Facebook, Twitter, GMail, and even WordPress and Drupal, all deliver the content so well that we often forget that the Web is a stateless mess. No machine remembers anything about a previous action, primarily because HTTP does not support states.
What is a state anyway?
When I say stateless, I mean to convey that in most cases, when we log into a Web application, the server does not know the state of the application on the client side. Which elements are being displayed, which ones are hidden, and what can be done on the page the server knows none of this. To make sure that an invalid request does not cause a security breach, and to assure the right response for every request, a number of methods are in use. In most cases, cookies are used to validate a user’s identity and authenticity, and the programmer has to build a system that could keep track of what the user does in his browser. This is important to make sure that the server side of the application does not send any invalid or unnecessary data to the client. QCubed, using its QForm library, however, takes a snapshot of the page and saves it on the server side before sending the HTML to the client. This state is used in later requests from the client. This technique improves the application reliability, and reduces the programmer’s work and complexity of design by a very large margin.
What is QForm?
In the previous article, we have already looked at Codegen, which helps build forms, and takes care of the Model part of QCubeds MVC architecture. QForm is the part of QCubed that handles the View and Controller parts of MVC. QForm is responsible for creation of the page, along with elements (we would call them controls) on the page (text-boxes, buttons, text, etc.) and helps the developer determine the events that will trigger actions, and the way in which those actions are to be handled. Before we go into code, let us first answer an interesting question: If QForm handles the Web page, why is it named QForm, not QPage?
The reason is, QCubed treats the entire page as a Form that submits to itself. This technique makes sure that the client does not have to know the names of other files used in the process, nor their paths, nor their function names a better level of security, you see! For example, if you allow the user to insert data in newpost.php, while insert_newpost.php handles the values from the form submission and inserts data into the database, then a bug in insert_newpost.php can possibly open a plethora of vulnerabilities! QCubed would normally hide the information about which file handles which request on the server. This technique has another benefit; it helps handle multiple events and actions easily. Now, without further ado, we will delve into the code.
Building the first Web page in QCubed
In previous articles, we created a small MySQL database to store blog posts and comments. Let us create a Web page that allows us to insert a new blog post in the database.
Code
Create a file named newpost.php in the root directory of your QCubed installation, and put the following code in it:
protected function btnSubmit_Click($strFormId, $strControlId, $strParameter) {
// Create new post
$objNewPost = new Post();
// Load defaults
$objNewPost->Initialize();
// Assign values from the form
$objNewPost->Title = $this->txtTitle->Text;
$objNewPost->Body = $this->txtBody->Text;
// Save
$objNewPost->Save();
// Saved. Show the result
$this->lblResult->Text = “Post was saved”;
// Empty the textboxes
$this->txtTitle->Text = ”;
$this->txtBody->Text = ”;
}
}
NewPost::Run(‘NewPost’);
And in the same directory, create another file named newpost.tpl.php, and put the following in it:
Create new Blog Post
RenderBegin(); ?>
lblMessage->Render(); ?>
Title txtTitle->Render(); ?>
Body txtBody->Render(); ?>
lblResult->Render(); ?>
btnSubmit->Render(); ?>
RenderEnd();?>
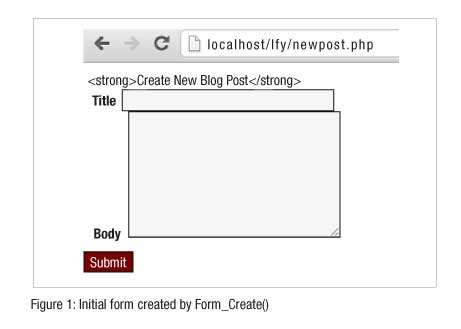
Then visit the newpost.php file in your browser; the output should look like Figure 1. Before you think that the strong HTML tag at the top is because of an error somewhere, let me tell you that such output is expected; we will know why shortly.
Understanding the code
QForm separates the presentation layer and program logic into two different files. The newpost.php file contains the logic of the page (controller), while the newpost.tpl.php governs the layout (view). We begin with the logic.
The first line of the controller file includes the qcubed.inc.php file from the root directory of your QCubed installation. This readies the framework capabilities to be used throughout the file. Next, we define a class NewPost, which is derived from the QForm class. Before we proceed with creating the HTML controls (such as text-boxes, buttons, etc), we define them as class members. If these variables are not defined as class members but as local variables inside the Form_Create function, you would not be able to render them, much less handle any actions on them. This is because the layout is created by the view file, which has no access to variables in the Form_Create function but can access class members.
The initial behaviour and content is determined by the Form_Create function. In this function, we define the controls (HTML elements). For example, when we do:
$this->lblMessage = new QLabel($this);
Here we actually tell QCubed to make an lblMessage class member variable of type QLabel, with the current QForm as the parent. The $this variable passed to the QLabel constructor indicates that the parent of lblMessage is the current QForm class.
The concept of parent is very important to HTML controls in QCubed (QCubed calls them QControls). One of the biggest features of the QForm and QControl library is that it allows you to create sophisticated composite controls and panels using other child controls. These controls and panels can have their own layout, defined behaviour and database interactions; they can have their own validation logic and are highly reusable. For example, you could create a calculator panel that can do basic math functions. Once you have created the panel, you can use it on any page by adding just a couple of lines; there is no need to write the same code over and over again for every page. Since controls can be nested, the concept of parent becomes important in controlling the behaviour, placement and visibility.
QLabel is a control that, when rendered, will create text on the page. We set the text to be displayed using the QLabels Text property by doing:
$this->lblMessage->Text = “Create new Blog Post“;
In a very similar fashion, we define other controls. The two text-boxes txtTitle and txtBody are to allow the user to input the title and body of a blog post; the btnSubmit button is to submit these values to the server. For most QControls, the Text property defines the text they would display. For example, QLabels Text will appear directly where rendered; QButtons Text will appear on the button; QTextBoxs Text will appear as the text in the input box. Every control has some common properties and some unique ones. For example, the TextMode property can exist in only QTextBox-based controls (QTextBox, QIntegerTextBox and QFloatTextbox) and can convert the text-box to a text-area, a password input control, or an HTML5 search text-box.
It is noteworthy that the Text of the label lblResult was kept blank, only so we could change it to something else later on.
This line:
$this->btnSubmit->AddAction(new QClickEvent(), new QAjaxAction('btnSubmit_Click'));
adds an action to the btnSubmit button for a click event. The AddAction function takes two parametersthe event, and the action. When specifying the event type, in most cases, creating a new event object inline is enough and recommended. QCubed supports all events allowed by JavaScript, and you can choose any one of them. The second parameter is the action, which can be one of these three types:
1. QServerAction: This will reload the entire page with the changes defined in the event-handler function. When a QServerAction is executed, the client sends an HTTP POST request over the wire. The server receives the request and runs the event-handler function, and makes any required visual changes to the page accordingly, and then sends back the entire page, thus reloading the page.
2. QAjaxAction: This will render the changes without reloading the page (using AJAX). In this case, the client submits the form using an AJAX request. The server runs the event-handler function, and records any changes needed for the layout. These changes are then transformed and sent to the client for reflecting the changes on screen.
3. QJavaScriptAction: This will call a JavaScript function on the client side. In this case, the event-handler function must be present on the client side. No calls are made to the server.
All these actions would take one parameterthe name of the function to be called when the event occurs. In our case, the function btnSubmit_Click will be called when btnSubmit is clicked. In case of QJavaScriptAction, the function passed in as the argument must have the braces included in the call, and the function must be present on the client sideeither included in another JS file, or inline in the document. QCubed cannot validate the availability of the event-handler functions, and it is the developers job to make sure that they exist.
Our event-handler function btnSubmit_Click takes in three parameters:
1. strFormID: This is the FormID (same as the class name).
2. strControlID: This is the control ID of the HTML element that initiated the action. Control IDs are generated automatically by QCubed when a new control is created. These are the same ones used for the id attribute of the element when it is rendered. The developer can enforce a desired ID by supplying it as the second parameter to the constructor, like:
$this->lblResult = new QLabel($this, resultLabel);
This will set the control ID of lblResult to resultLabel. QCubed allows only alphanumeric control IDs.
3. strParameter: This is any extra parameter that needs to be passed to the function. This parameter can be set by using the ActionParameter property of the QControl.
In most cases, you would not need to use them, but they are needed to be present in the event-handler function. With time, you would discover that these three parameters can help you reduce coding efforts and cut short development time even more.
Now we take a look at what the event handler does. Inside the event handler, we create a new blog post object named $objNewPost. (Remember, QCubed creates classes for each of your tables, and your rows are treated as objects of the table class.) Like we did in the last article, we initialise the object with database defaults, set the value of the post title and body, and save the post. We also set the text of lblResult to Post was saved and empty the text-boxes txtTitle and txtBody. There are a few points worth noting:
1. We retrieve the values input into QTextBox controls by just fetching theirText property value. The same property is used to set the values as well (as we did for the QButton and QLabels). You do not have to make any extra effort to retrieve values from $_POST or $_GET arrays, anywhere.
2. Though all the actions are taken via AJAX, QCubed does not require us to deal with the low-level JavaScript, and XmlHttpRequests and responses. You do not write any HTML to be sent. Just set the values to what you want, and QCubed will calculate what needs to be done by itself.
3. The event handler does not return any value event-handler functions will not return values. If you want to terminate the function conditionally (e.g., if the input in the txtTitle text-box was blank), then simply return without any value.
4. The server keeps a copy of the state of the application on the client side, and every time the page updates itself via a QServerAction or QAjaxAction, the server updates and syncs the copy of the page state. You do not need to worry about what data the variables contain on the server side they always contain the last submitted value. If you use the back button, the server knows that you clicked the back button (well, not exactly, but it’s safe to assume it at the outset of our journey with QCubed) and uses the corresponding state to produce the HTML. Whatever be the case, in the end, you will not have to go through anomalies.
All the code in the controller file is useless if you do not Run the file. To run the file, we need to call the public static function Run, with the class name as the parameter. This function is built into QForm, and is not meant to be written manually. It tells QCubed to search for the template file in the same directory. By default, it would look for a file with the same name but ending in .tpl.php instead of .php. If you want to use a different file as the view file, you may pass the filename as a second parameter to the Run function, like:
NewPost::Run(NewPost, newpost_alternate.tpl.php);
This will force QCubed to use newpost_alternate.tpl.php as the template file. Such a technique can be used to create multiple layouts for the same page!
The view file
The view file contains the HTML skeleton of the page. The only thing you do not have to write in this file is the HTML for the individual controls, which you defined in the controller file. You would instead call the Render function on those controls this makes sure that QCubed takes control of their behaviour. The view file would typically begin with the HTML head section containing the page title, and any extra JS and CSS to be loaded. You might want to create a static PHP page to be included for the purpose. Remember that, as of now, QCubed does not come with any special functions to help you with the HTML head section. All controls must be rendered between two lines:
$this->RenderBegin(); and $this->RenderEnd();.
An attempt to render a control beyond these boundaries will cause the framework to produce an error and halt. It is advisable to put the RenderBegin() function just after the body tag begins, and RenderEnd() just before the body tag closes. Again, controls will not render themselves unless you ask them to. If you removed the line $this->btnSubmit->Render();from the view file, then the submit button will disappear from the page.
And now, the one question we left unanswered why does lblMessage show the strong tags on the page instead of making the text bold? It is because QCubed enables the htmlentities function for the text in all QLabel variables. In the Form_Create() function, just set:
$this->lblMessage->HtmlEntities = false;
You will see (Figure 2) that the strong tag g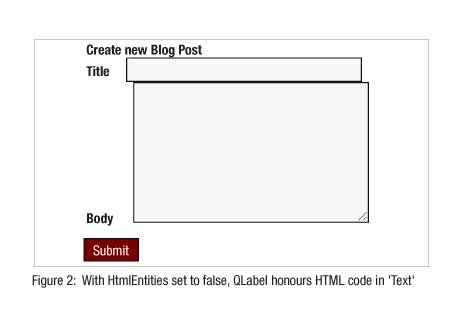 ets back its importance!
Behaviour
The page behaviour is pretty obvious. It will accept the title and body of a post, and when the Submit button is hit, it creates a new post and saves it to the database, erases the contents of the title and body input boxes, and displays a message that the post was saved.
The real power of QForms
Throughout this article, we have discovered some of the core features and functionalities of QForms. Here is how they help you:
1. Separate View and Controller files: QForm separates the HTML layout from behaviour. Chances of messing up HTML and PHP code are lower than ever. Since model is automatically taken care of by Codegen, we are not going to worry about that.
2. Event-driven: You define a control, bind it to an event, and write the event-handler function for the same. QForm does the rest.
3. AJAX is easy: One does not need to write JS functions, remember form element names and IDs, and there is no need to deal with the $_POST array either. QCubed does the dirty work, allowing you to focus on what to do rather than how to do.
4. AJAX to page reloads and vice versa: Changing the behaviour of an action from a full page reload to AJAX based can be done by changing just one wordthe action type.
5. Less HTML than ever: QCubed produces HTML code for single elements, while you have to take care of only the overall page structure. Combined with Codegen, it means roughly 80 per cent reduction in the amount of HTML and JavaScript you would write otherwise. Also, the fact that most HTML code is automatically generated means that you have to deal with far fewer syntax errors in HTML code.
6. Stateful: The server knows the state of the page on the client side, and that improves security as well as ease of use for the programmer.
This article hardly scratches the surface of QForm. There are a lot of other powerful features built into QForm; some interesting ones includecontrol and form validation, custom controls, database-based session handling, centralised form state handling, HTML input validation and purification for preventing XSS attacks, and so on. We will peek into a few of them in the next article of this series.


