Rendering
Now, all you have to do is render the video in your desired format (Figure 6). But here is the tricky part. There could be a lot of unused clips and audio files on your timeline and if you render this project, all that unwanted material will also get added to your film. So either remove those clips from the timeline or use the ‘Lock Track’ option to lock the tracks where they are on the timeline, so that they don’t get moved while you are fiddling with other tracks. This is very important while rendering a project.
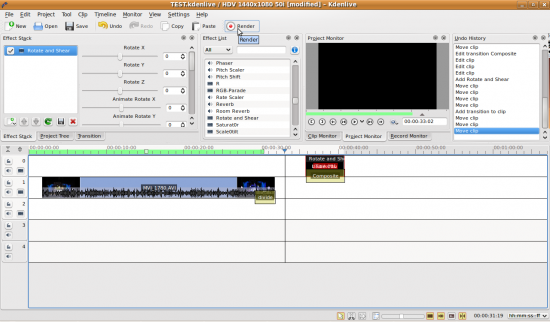
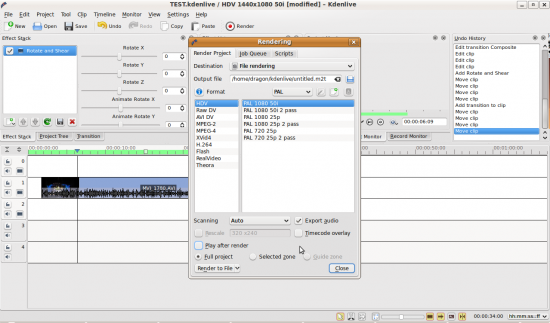
To render your project, look out for the green bar at the top of the timeline and stretch it from one end to the other end of your project. Rendering will export only this portion of your timeline. Now, when you click on the Render button, you will see the Options window (Figure 7). Here, you will have to select the format in which you want to export or render your movie. This selection will recommend the correct format type for the medium in which you want to burn your film. Then select the location that you want to save the file in, under the ‘Output File’ option. Make sure you have enough space on that location as exported/rendered media can be huge, depending upon the format you have chosen. Then select the ‘Selected Zone’ instead of ‘Full Project’, unless you want the former, and click on ‘Render To File’.
There! You have exported your very own video using Kdenlive. I am impressed with Kdenlive because unless you push it to the limits by adding a lot of clips while moving them around, it will not crash. I have even tried this for two days and it crashed only twice, and only when I dragged a lot of clips on the timeline.
So, Kdenlive is an awesome and pretty powerful tool for film lovers. If you like making films and think FCP or Sony Vegas Pro are better, instead of wasting $1000 on buying them, get together some friends who need these tools and collect the money they plan to spend, from them. Thus, if there are 10 friends, you’ll have $10,000 and you can use that to fund Kdenlive’s development instead!
You can find the video I created using Kdenlive in YouTube.
Some film making terminology
- Cut-to-Cut – When you add one clip after another, without using any effect
- Fade to black or fade from black
- Fade in and fade out – Audio volume increasing from ‘none’ and audio decreasing to ‘none’
- Edit Point – Whenever you are shooting a video, always start shooting at least 5-10 seconds before the event/activity starts and shoot at least 5-10 seconds extra after the activities end. This way, when you go to your Kdenlive editing table, you won’t bang your head that you cannot find the edit point. The edit point is that specific frame that goes well with the last frame of the previous clip, or the first frame of the next clip.
And finally some tips
- Never shoot against the sun, it may damage the CCD of your camera.
- Always take care of the White Balance. If you are shooting in different lights, please adjust the White Balance of your camera as every light has its own colour temperature. If you do not do this while shooting, you might find that the colours of the object have changed in the movie.
You can read more about the grammar of film-making here.


