In the UNIX operating system everything is a file, which makes it an easy-to-manage and administrator-friendly system. The traditional way of managing UNIX was to use the telnet interface, but being a plain-text protocol, telnet exposes you to the risk of network snooping and compromise of login credentials. SSH works on an encrypted channel to overcome the snooping issues. A UNIX administrator can SSH into the box from a remote machine and change the configuration or execute commands remotely.
Generally, it is considered a good practice to take a configuration backup before making any changes to the production configuration so that the old configuration is available for roll-back. Also, as a part of the organisation’s policy, the same base configuration should be configured on all the servers to reflect consistency and as a server-hardening practice. A majority of the problems in the UNIX environment occur due to ad-hoc changes, which can be mitigated by following proper change management procedures. Handling and monitoring ad-hoc changes, and restoring the previous state, remains a challenge for organisations.
Meeting such challenges is quite workable for a small set-up of 1-20 servers and a dedicated UNIX administration. But during hardware failure or other problems, where the servers need to be reconfigured from scratch, it takes a lot of effort and time in restoring the servers to the previous state. To handle such scenarios, a quick solution would be to hire another UNIX administrator who could act as a secondary resource and offloads other activities from the primary resource during disaster conditions.
Think about a scenario of managing a globally-distributed data centre with 500 *NIX servers or more, comprising Solaris, Debian, Ubuntu, Fedora, CentOS, etc. Here, servers are running with the same base configuration and packages, where configuration files need to be checked-out to a version-controlled repository. Only planned changes are allowed and the previous configuration state is restored for unplanned changes. Additionally, centralised user and policy management, along with automated configuration recovery during disaster conditions are required. In such a case, building a team of 10-20 administrators would not be a recommended approach. Rather, using a centralised configuration tool to automate the administration tasks would be a better option to follow.
Along with commercial tools like BladeLogic and OpsWare, there are a couple of open source systems automation and configuration management tools available like Bcfg2, Cfengine and Puppet. Cfengine has been an administrator’s favourite configuration management framework since the past few years and is widely being used by many companies. Puppet turns out to be a next-generation configuration management tool to overcome many of Cfengine’s weaknesses.
Puppet is written in Ruby and is released under the GPL. It supports a number of operating systems like CentOS, Debian, FreeBSD, Gentoo, OpenBSD, Solaris, SuSE Linux, Ubuntu, etc. Puppet is being used by many organisations including Google, which uses it to manage all Mac desktops, laptops and Linux clients. A list of other Puppet users can be fetched from reductivelabs.com/trac/puppet/wiki/WhosUsingPuppet.
Puppet installation
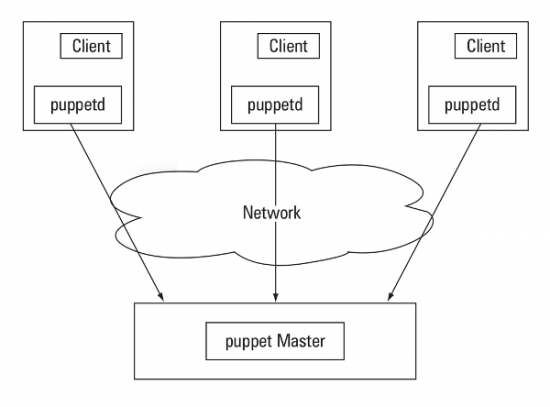
Puppet installation is fairly easy and is, in fact, a matter of seconds. Puppet runs in client-server configuration, where the client polls the server at port 8140 every 30 minutes to check for the new instructions or to match the configuration files. The client also listens to a port to have push-updates from the server. In Puppet terminology, a client is called a Puppet node and a server is called a Puppet master. Figure 1 shows the set-up.

The following few steps demonstrate the installation steps for the CentOS operating system—a similar approach can be followed for other supported systems:
On the server side:
- Define the hostname for server as puppet.domain.com
- Puppet can be installed using yum, but packages are not part of the default CentOS repositories or installation DVD. Even though it is available at DAG’s repository, the versions are outdated. The best repository for Puppet is EPEL (Extra Packages for Enterprise Linux). Puppet RPMs can either be directly downloaded and installed, or the yum repository can be configured to do the job. To use the EPEL repository, run the following command as a root user:
rpm -Uvh http://download.fedora.redhat.com/pub/epel/5/i386/epel-release-5-3.noarch.rpm
- Now install the Puppet server by issuing the following command:
yum install puppet-server
- Install ruby-rdoc to enable Puppet command line help:
yum install ruby-rdoc
- Now, create a sample manifest file to start the Puppet server. This is just a test manifest and more complex manifests can be created using this tool, which will be demonstrated later. Put the following contents into the file using Vim or any other text editor. The purpose here is to create
/tmp/testfileon a node (puppet client) if it doesn’t exist:class test_class { file { "/tmp/testfile": ensure => present, mode => 644, owner => root, group => root } } node puppetclient { include test_class }In the above content, the upper section defines a class named
test_classthat ensures that/tmp/testfilewith the defined permission is present on the client where the class will be included. In the lower section, client puppetclient includes thetest_classand Puppet will create the file with the set permission on puppetclient if it doesn’t already exist. Once done, start the Puppet server using the following command:service puppetmaster start
- The Puppet server is now installed and configured to listen to incoming connections from agents. Default installation comes with Webrick, which is not a good Web server to handle loads from a higher number of Puppet agents. Apache and Mongrel can solve this problem. Refer to the Puppet wiki for instructions on configuring Puppet with Mongrel.
On the client side:
- Define the hostname for the server as puppetclient.domain.com
- Configure the EPEL repository using the following command again:
rpm -Uvh http://download.fedora.redhat.com/pub/epel/5/i386/epel-release-5-3.noarch.rpm
- Install puppet and ruby-rdoc:
yum install puppet ruby-rdoc
This completes installation of the Puppet server and client.
Before proceeding further, make sure that the systems timing for the Puppet server and client are in sync. Now, from the client, issue the following command to get approval from the server as its subscriber:
puppetd --verbose --server puppet.domain.com
This will display the following output:
info: Creating a new certificate request for pclient.torridnetworks.com
info: Creating a new SSL key at /var/lib/puppet/ssl/private_keys/puppetclient.domain.com.pem
In the above command, the client has raised a request to the server to be registered as a subscriber. Now, the server needs to approve the subscriptions. To view the pending subscriptions, issue the following command on the server:
puppetca --list
The above command will give the name of the node that needs to be approved or signed by the server. In the next command, sign that node:
puppetca -s puppetclient.domain.com
Once the client is approved by the server, the class assigned to the client will be executed. In this case, a file /tmp/testfile will be created on puppetclient.domain.com. If the created file is deleted, it will be recreated on the next polling, i.e., within the next 30 minutes.
Once the basic Puppet infrastructure is ready, different classes can be created to accomplish different tasks.
Some sample Puppet classes
Below are a few sample classes for quick reference.
Sample 1: To install Apache and run the httpd service:
class apache {
package { httpd: ensure => installed }
service { "httpd":
ensure => running,
require => Package["httpd"],
}
}
Sample 2: To stop the mdmdp service:
class redhat {
service {
"mdmdp":
enable => true,
ensure => stopped,
}
}
Sample 3: To execute commands:
class start_vhost {
$noop = true
exec { "/usr/sbin/start_ws": }
exec { "/usr/sbin/start_vhost": }
}
Sample 4: To start a service as per the remote operating system:
class httpd_service_start {
case $operatingsystem {
redhat: { service { "httpd": ensure => running }}
debian: { service { "apache": ensure => running }}
default: { service { "apache2": ensure => running }}
}
}
Sample 5: To create a user:
class virt_users {
@user { "jsmith":
ensure => "present",
uid => "507",
gid => "507",
comment => "John Smith",
home => "/nfs/HR/home/jsmith",
shell => "/bin/bash",
}
Sample 6: To manage Cron job:
class set_cron_syscheck {
cron { "syscheck":
command => "/usr/bin/syscheck",
user => "root",
hour => "18",
minute => "0"
}
}
Sample 7: Transferring a file from the Puppet server:
class httpd_conf {
file { "httpd.conf":
source => "puppet://puppetmaster/httpd/conf/httpd.conf"
}
}
Of course, much more detailed manifests can be created to manage multiple servers with heterogeneous UNIX operating systems. Subversion can be configured with Puppet to store configuration files and track changes, so that the changes can be reverted to a previous state.
Reporting is one of the important aspects of a configuration management system. Reporting from a configuration management system can provide information on performance and compliance to policies and standards. Puppet’s reporting engine is limited at this stage, but still allows some useful basic reporting that can be graphed and displayed.
So, all in all, Puppet can be a real boost for UNIX administrators.


Great article! Linux automation beginners might also like to check out this tutorial on server configuration management with Puppet, which covers the latest Puppet 0.25.0 release and the standard directory layout described by the community best practices document.
One useful addition would be to note that the test class example goes in the file /etc/puppet/site.pp — without that, when you try to start puppetmaster, you get “undefined method `findclass’ for nil:NilClass”, a singularly unhelpful error message…
installation issue: dependency error.. can you please give me any other links for rpms that wont look for any dependency ??
Good blog on puppet configurations for system admins
http://puppet-cmt.blogspot.com/